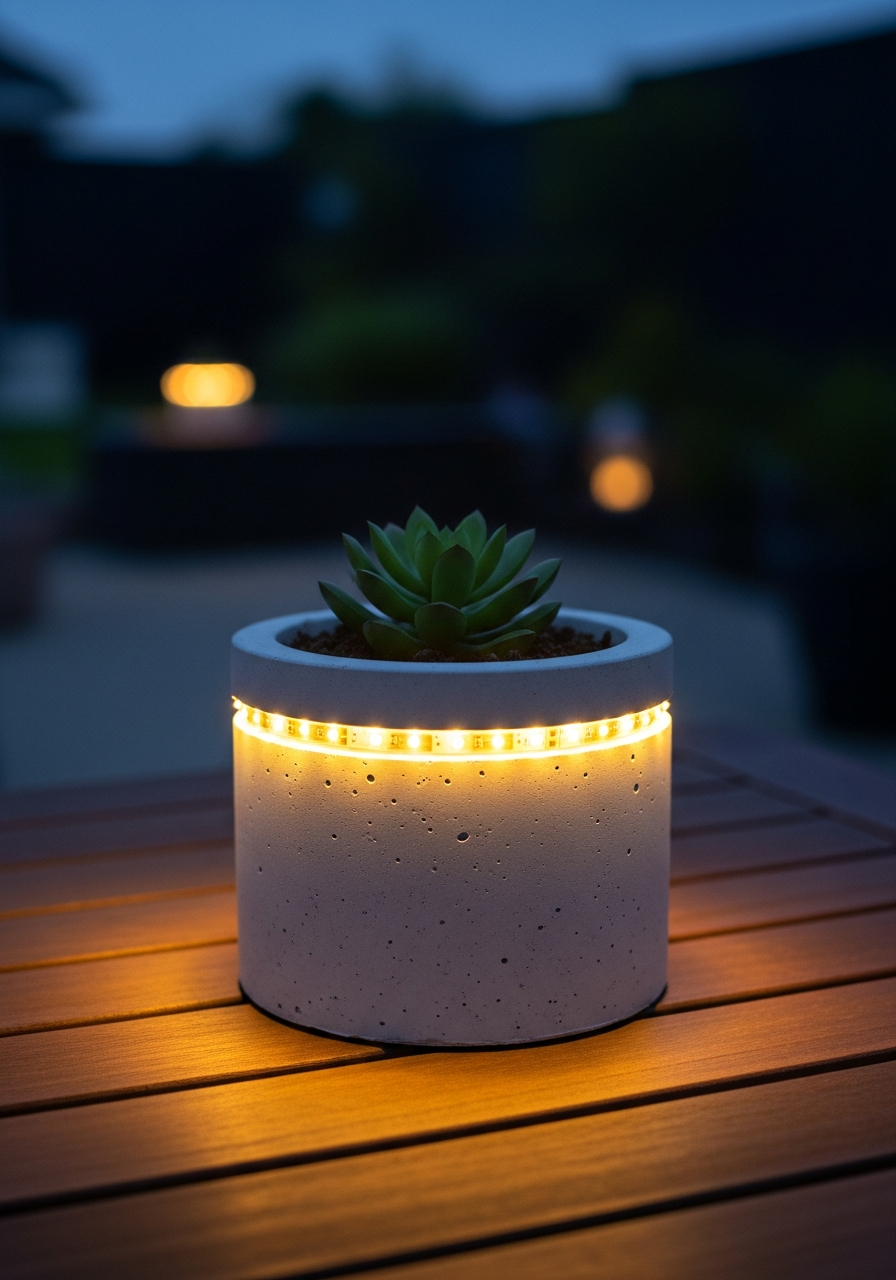
If you’re looking to elevate your outdoor décor with something modern, functional, and eye-catching, DIY cement planters for lights are the perfect solution. These planters combine greenery with built-in lighting to create a soft glow that looks stunning day and night.
Ideal for patios, walkways, balconies, and garden paths, lighted cement planters are durable, weather-resistant, and surprisingly easy to make at home.
Why Choose Cement Planters with Built-In Lights?
Cement planters with lights are:
- Modern and stylish
- Durable and long-lasting
- Perfect for outdoor ambiance
- Functional as both décor and lighting
- Customizable in size, shape, and finish
They provide structure during the day and a warm glow at night.
Supplies You’ll Need
- Cement or concrete mix
- Planter molds (silicone, plastic, or DIY containers)
- Solar lights, LED puck lights, or string lights
- Mixing bucket and stir stick
- Water
- Cooking spray or mold release
- Sandpaper
- Optional: concrete pigment, sealant, gloves
Best Lighting Options for Cement Planters
- Solar pathway lights (most popular & no wiring)
- LED puck lights (battery-powered)
- Solar string lights
- Mini waterproof lanterns
Solar lights are ideal for outdoor use and low maintenance.
How to Make DIY Cement Planters for Lights
Step 1: Prepare the Mold
Coat the inside of your mold with cooking spray or mold release.
Step 2: Mix the Cement
Mix cement with water until it reaches a thick, smooth consistency similar to pancake batter.
Step 3: Pour the Base
Pour cement into the mold to form the bottom of the planter.
Step 4: Create Space for the Light
Insert a solar light stake upside down, or place a small plastic cup or tube where the light will sit. This creates a hollow channel.
Step 5: Insert Inner Mold
Place a smaller container in the center to create the planting cavity. Add weight if necessary.
Step 6: Fill the Sides
Pour cement around the inner mold, tapping the sides to release air bubbles.
Step 7: Cure
Allow the planter to cure for 24–48 hours (or per cement instructions).
Step 8: Demold & Finish
Remove molds carefully and sand any rough edges.
Drainage & Safety Tips
- Add a drainage hole using a straw or dowel
- Keep lighting compartments separate from soil
- Use waterproof lights only
- Seal the interior for indoor use
Styling Ideas for Cement Planters with Lights
- Line garden paths or driveways
- Use ornamental grasses for a modern look
- Add glass pebbles around the light opening
- Paint or stain for custom color
- Group planters in sets of three for balance
Best Plants for Lighted Cement Planters
- Succulents and cacti
- Snake plants
- Ornamental grasses
- Herbs like rosemary and thyme
- Low-growing flowers
Choose plants that won’t block the light source.
Care & Maintenance
- Clean solar panels regularly
- Replace batteries when needed
- Reseal concrete annually
- Bring indoors during extreme freezing temperatures
Final Thoughts
DIY cement planters for lights offer the perfect blend of modern design and practical function. With minimal materials and a little creativity, you can create glowing planters that enhance your outdoor space and impress guests year-round.
Strong, stylish, and softly glowing—these planters are a standout DIY ✨🪴🧱
Want More DIY Cement & Garden Lighting Ideas?
Follow us for modern garden projects, budget-friendly outdoor décor, and creative DIY inspiration.