
Replacing traditional grass with a no-mow lawn is one of the best ways to reduce yard maintenance, save water, and create a more sustainable outdoor space—especially for small yards and urban homes.
Whether you’re planning a clover lawn, native ground cover, or a low-maintenance landscape blend, this step-by-step guide will walk you through the entire process.
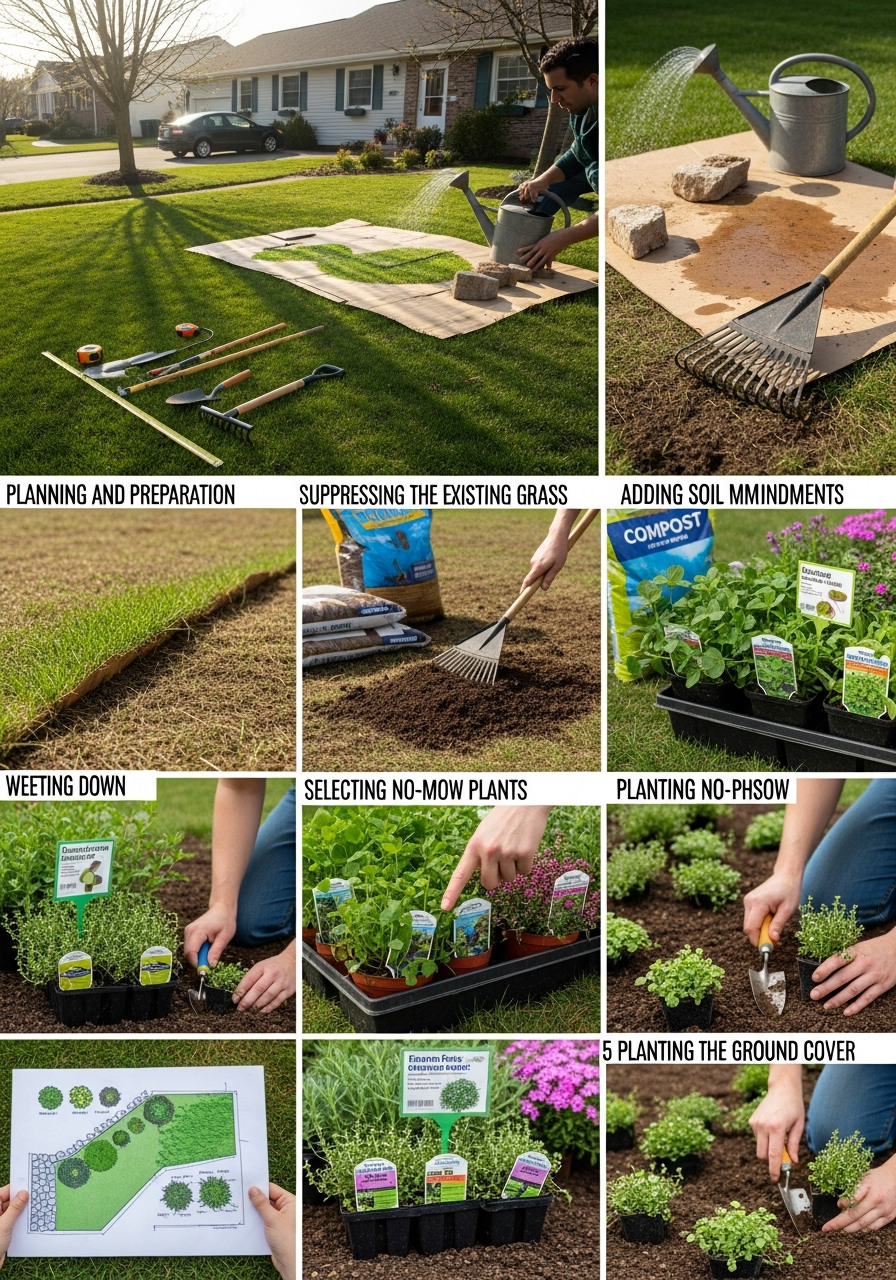
Step 1: Decide on Your No-Mow Lawn Type

Before removing any grass, choose what will replace it. Your choice should depend on sunlight, foot traffic, and climate.
Popular no-mow options include:
- Clover or microclover
- Creeping thyme
- Native ground covers (sedge, yarrow, wild ginger)
- Moss (for shady areas)
- Gravel or hardscape with plants
Ask yourself:
- How much sun does the area get?
- Will people or pets walk on it often?
- Do I want flowers or a uniform look?
Step 2: Measure and Plan the Area

Measure your lawn and sketch a simple plan. Even a rough drawing helps you estimate materials and visualize the finished space.
Planning tips:
- Mark paths, borders, and seating areas
- Decide if you’ll mix multiple ground covers
- Check local regulations or HOA rules (important in urban areas)
Step 3: Remove the Existing Grass

There are several effective ways to remove grass. Choose the one that fits your timeline and effort level.
Option A: Sheet Mulching (Best for Most Homeowners)
- Lay cardboard or newspaper over grass
- Wet thoroughly
- Cover with compost and mulch
- Wait 4–8 weeks for grass to decompose
Option B: Sod Cutter (Fastest)
- Rent a sod cutter
- Physically remove grass
- Best for large or time-sensitive projects
Option C: Solarization (Hot Climates)
- Cover grass with clear plastic
- Let sun heat kill grass over 4–6 weeks
Avoid chemical herbicides if possible—they can harm soil health.
Step 4: Prepare the Soil

Healthy soil helps your no-mow lawn establish quickly.
What to do:
- Rake smooth and remove debris
- Loosen compacted soil
- Add compost if soil is poor
- Level the area gently
Different plants have different soil needs—check requirements before planting.
Step 5: Install Your No-Mow Lawn

Now comes the transformation.
For Seeded Options (Clover, Thyme)
- Broadcast seeds evenly
- Lightly rake into soil
- Water gently and consistently for 2–3 weeks
For Plugs or Plants
- Space plants according to growth habits
- Dig small holes and firm soil around roots
- Water deeply after planting
For Gravel or Hardscape
- Install landscape fabric
- Add base layer (crushed stone)
- Top with gravel or decorative stone
Step 6: Water and Establish

Even drought-tolerant no-mow lawns need water while establishing.
General guidelines:
- Water daily for the first 1–2 weeks
- Gradually reduce frequency
- Avoid overwatering once established
Most no-mow lawns fully establish within 1–3 months.
Step 7: Maintain (Minimal Effort!)

One of the biggest benefits of a no-mow lawn is how little upkeep it requires.
Basic maintenance includes:
- Occasional weeding during the first year
- Light trimming once or twice a year (if needed)
- Seasonal cleanup of debris
No weekly mowing. No fertilizing schedules. No stress.
Common Mistakes to Avoid
- Choosing plants unsuited to your sunlight
- Skipping soil preparation
- Overwatering after establishment
- Expecting instant results (patience pays off!)
Final Thoughts
Replacing grass with a no-mow lawn is a smart, sustainable upgrade that pays off year after year. With the right planning and a little initial effort, you’ll enjoy a beautiful outdoor space that saves time, water, and money.
Whether you live in a dense city or a compact suburban lot, a no-mow lawn can completely transform how you use and enjoy your yard.